A database of 171 failed geosynthetic-reinforced MSE walls documented water infiltration, weak backfill, and inspection lapses as the dominant failure drivers — problems that originate during installation, not after.
This guide walks through the complete installation sequence for geocell retaining walls: from site assessment and permitting through post-installation validation. It's written for contractors, civil engineers, and site crews working on civil infrastructure projects in Iowa and beyond. For walls exceeding 4 feet in height, engineering oversight isn't optional — it's essential.
Key Takeaways
- Subgrade preparation and drainage design are non-negotiable prerequisites that determine long-term wall performance
- Most jurisdictions require permits for retaining walls over 4 feet; confirm local codes before breaking ground
- Follow this sequence: permit → excavate → geotextile → geocell deployment → fill and compact → layer and validate
- Infill compaction at every layer is the most under-executed step on geocell projects
- Establish vegetation on the wall face post-installation to strengthen erosion resistance
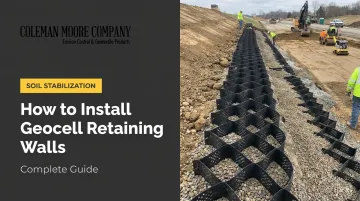
Installation Overview for Geocell Retaining Walls
Geocell retaining wall installation breaks into four phases: subgrade preparation, panel deployment and anchoring, layer-by-layer filling and compaction, and post-installation validation. Each phase depends on the previous one — a failed subgrade prep means the entire wall is compromised, regardless of how well subsequent steps are executed.
Wall height, soil conditions, and site access determine the time and equipment required. A two-foot slope stabilization and a ten-foot infrastructure wall are fundamentally different projects, even if both use geocell panels.
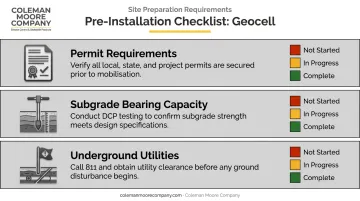
Prerequisites and Safety Considerations
Confirm these before any excavation begins:
- Permit requirements : Most jurisdictions, following ICC model code language, exempt retaining walls not over 4 feet measured from bottom of footing to top of wall, unless supporting surcharge loads. Local AHJ requirements control; verify before proceeding.
- Subgrade bearing capacity : Use Dynamic Cone Penetrometer (DCP) testing to assess in-situ soil strength and convert readings to CBR values. Iowa SUDAS Chapter 6 provides DCP-to-CBR correlations using the formula CBR = (292 / PI)^1.12 for general soils. Coleman Moore Company offers on-site DCP testing for Iowa projects. Their team performs field tests, converts results to CBR values, and provides design recommendations to confirm subgrade readiness before the first panel goes down.
- Underground utilities : Iowa One Call requires excavators to notify 811 at least 48 hours in advance (excluding weekends and holidays) before any excavation. Call 811 or visit 811beforeyoudig.com.
Non-negotiables before proceeding:
- Do not install on waterlogged, frozen, or recently disturbed subgrade without remediation
- Do not skip geotextile fabric — it is a structural separator, not optional
- Verify geocell product specs match design requirements before materials arrive on site
With prerequisites confirmed and site conditions validated, gather materials and equipment before mobilizing to site.
Tools and Materials Required
Essential checklist:
- Geocell panels (HDPE, sized per engineering specification)
- Non-woven geotextile fabric (Coleman Moore supplies Mirafi non-woven geotextiles suitable for separation and drainage applications)
- Ground stakes or anchors
- Stretcher bars or panel expansion tools (confirm availability with your geocell supplier — these are product-specific)
- Infill material: granular crushed stone or gravel per project spec
- Vibrating plate compactor and hand tamper
- Utility knife, level, tape measure, string line and stakes
- Appropriate PPE
Granular, free-draining infill should be used over cohesive soils for retaining wall applications. Confirm infill gradation meets your project specification before mobilizing materials.
How to Install a Geocell Retaining Wall: Step-by-Step
Geocell retaining wall installation follows a strict bottom-up sequence. Shortcuts at any step (subgrade prep and compaction especially) compound through every subsequent layer. Problems that are easy to correct during installation become expensive to fix after completion.
Step 1 — Plan, Permit, and Mark the Layout
Use stakes and string line to establish the wall footprint. Confirm wall length, height, and setback from structures or property lines. Obtain permits. Flag all underground utilities.
Determine wall type (gravity wall versus steepened slope design) as this affects geocell depth selection and whether geogrid reinforcement is required. For walls requiring geogrid reinforcement, Coleman Moore supplies Tensar geogrids for surcharge-loaded or taller applications.
Step 2 — Excavate and Prepare the Foundation
- Clear the work area — Remove vegetation, roots, and loose debris completely
- Excavate the foundation trench — Depth should accommodate a compacted gravel base (typically 6–8 inches) plus embedment of the first geocell layer below final grade
- Remove weak soils — Replace saturated, compressible, or highly organic material with compacted structural fill
- Confirm level — Use a level and string line to verify the trench bottom is level across its full width before proceeding
Taller walls and weaker subgrade conditions require deeper embedment. Don't underestimate this step : a trench off-level by even an inch creates alignment problems that propagate through every layer above.
Step 3 — Install Geotextile Fabric and Drainage Layer
Roll out non-woven geotextile fabric across the full excavated area, extending up the slope face. FHWA NHI-10-024 specifies a minimum 12-inch overlap at all seams ; verify this is maintained throughout.
The geotextile functions as a soil separator, preventing fines migration from destabilizing the structure over time. Where a free-draining granular base is specified, encapsulate the base material in the geotextile and ensure subdrain outlet pipes maintain a minimum 1% gradient for drainage. WisDOT's 2025 MSE wall survey reported backfill loss in 40% of agency responses, with the majority traced to inadequate separation and drainage. Skipping or undersizing this layer is the leading cause of premature wall failure.
Place and compact the granular base layer over the geotextile to the specified depth before proceeding.
Step 4 — Expand and Anchor the Geocells
Using stretcher bars, expand geocell panels to their full working width across the prepared surface. Connect adjacent panels using the manufacturer's specified method ; heavy equipment that close displaces unsupported panels
- Allow tracked equipment in the reinforced backfill zone only after at least 6 inches of fill covers the reinforcement layer
Verify compaction is uniform across the entire layer before stacking the next one. Underfilled or poorly compacted cells are the most common cause of post-construction settlement , and there's no correcting it once subsequent layers are in place.
Step 6 — Stack Additional Layers and Cap the Wall
Place each successive geocell layer on top of the compacted layer below, following the engineered setback and vertical alignment plan. Accurate alignment of the outer cell face matters more than any arbitrary stacking offset.
Repeat the anchor-fill-compact sequence for every layer until design height is reached. Then:
- Backfill the retained soil zone behind the wall in lifts no greater than 12 inches (per FHWA guidance), compacting each lift
- Cap the top with porous backfill material (gravel or coarse sand)
- Address the exposed face with geotextile or vegetation establishment per project specification
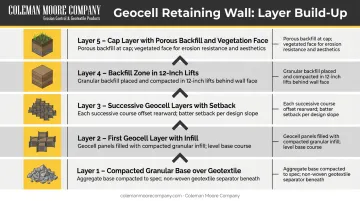
Vegetation on the wall face adds erosion resistance and is achievable once the final layer is secured.
Post-Installation Checks and Validation
Before the wall is loaded or the project is handed over, complete these checks:
Visual inspection:
- Uniform cell alignment across the full wall face
- No sections appearing underfilled or shifted
- Wall face is plumb within acceptable tolerances
- No visible bulging or outward lean
Once the visual pass is complete, confirm functional performance:
Functional confirmation:
- Water drains freely through the base and wall face without pooling behind the structure
- All anchor points and connection seams are intact with no signs of separation
- Drainage pathways behind the wall are clear
Skipping post-installation validation is a documented contributor to delayed failures. WisDOT research found that small deficiencies undetected at installation regularly become structural problems within the first season of weather exposure, particularly in freeze-thaw climates. Document what you find and address any deficiencies before the project is closed out.
Common Installation Problems and Fixes
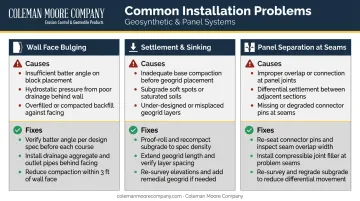
Issue 1: Wall Face Bulging or Outward Lean
The wall face bows outward during or after filling. This typically traces back to one of three causes:
- Anchors not fully driven before filling begins
- Heavy compaction equipment operating too close to the wall face
- Cohesive infill generating lateral pressure during settlement
Verify all anchors are set before any fill goes in. Keep heavy compaction equipment at least 3 feet from the wall face — hand tamp only in that zone. If cohesive fill was used, remove it and replace with the specified granular material.
Issue 2: Settlement and Sinking in Upper Layers
Top layers sink or become uneven weeks to months after installation. Common causes include:
- Under-compaction in lower layers
- Voids left unfilled in individual cells
- Subgrade failure beneath the foundation trench
Each layer must reach specified density before the next one is placed — there's no correcting under-compaction after stacking. If subgrade failure is suspected, excavate and assess bearing capacity before continuing. For in-progress projects, on-site DCP testing (which Coleman Moore Company provides) can confirm whether subgrade bearing capacity is adequate before the first panel goes down.
Issue 3: Panel Separation at Connection Seams
Adjacent panels pull apart at connections during or after installation. This usually comes down to one of three setup errors:
- Panels not fully expanded before connecting
- Incorrect or missing connection hardware
- Panels installed under tension without adequate end anchoring
Always expand panels to full working width before connecting adjacent sections. Use only the manufacturer's specified connection mechanism. Set end anchors before intermediate fills — this prevents panels from pulling apart as filling progresses.
Pro Tips for Installing Geocell Retaining Walls Effectively
Schedule earthwork during dry, stable conditions. Iowa's freeze-thaw cycles directly affect subgrade moisture and load-carrying capacity — a point Iowa SUDAS documents explicitly. Plan excavation before the ground freezes in fall, or wait until it has fully thawed and drained in spring. Frozen or thawing subgrade simply won't compact properly.
Choose infill carefully — it affects everything downstream. Well-graded crushed stone or gravel outperforms native soil as retaining wall infill: it compacts predictably, drains freely, and resists lateral pressure better than cohesive or silty material. Verify that the proposed infill meets your project's gradation specification before materials arrive on site.
Document every layer before it's covered. Good field records protect the project and support warranty compliance. At minimum, track:
- Compaction passes per lift
- Any areas that required subgrade remediation
- Photographs at each significant stage before the next layer goes down
If post-construction performance questions arise, this documentation is the first thing anyone will ask for.
For walls exceeding 4 feet, walls retaining slopes or surcharge loads, or sites with variable subgrade, engage a geotechnical engineer before breaking ground. Coleman Moore Company provides site evaluations, product selection guidance, and infill specification support for contractors and engineers across Iowa — reach the team at 515-309-5577 or info@colemanmoorecompany.com.
Conclusion
Geocell retaining wall performance is set during installation. The quality of subgrade preparation, the thoroughness of compaction at every layer, and the integrity of drainage design determine whether the wall performs reliably across its design life or develops problems within the first season of freeze-thaw cycles.
Follow the installation sequence without shortcuts. Complete post-installation validation before backfilling and loading. When site conditions fall outside standard parameters, consult experienced suppliers or engineers rather than proceeding on assumptions — Coleman Moore Company, for example, offers technical guidance from design stage through installation for Iowa civil infrastructure projects. Geocell walls give you real flexibility in design and logistics; that flexibility pays off only when the foundational steps are done right.
Frequently Asked Questions
Is a geocell retaining wall cheaper than poured concrete?
Geocell retaining walls are generally less expensive than poured concrete — they require no formwork, less specialized equipment, and can use locally sourced fill. Actual savings vary by wall height, reinforcement needs, and site access, so a project-specific cost analysis is the most reliable comparison.
What is the difference between geocell retaining walls and gabion walls?
Gabion walls use wire mesh baskets filled with rock, forming a rigid, porous structure. Geocell retaining walls use flexible HDPE honeycomb panels filled with soil or aggregate, offering greater design flexibility, the ability to support vegetation on the face, and typically lower material costs. Geocells also allow for more varied infill options than gabions, which require durable stone.
How deep should the foundation trench be for a geocell retaining wall?
Foundation trench depth is project-specific but typically ranges from 6 to 12 inches below finish grade to accommodate a compacted gravel base and the embedment of the first geocell layer. Taller walls and weaker subgrade conditions require deeper embedment — confirm with your engineering specification.
What is the best infill material for a geocell retaining wall?
Well-graded crushed stone or gravel is the preferred infill for retaining wall applications. It compacts reliably, drains freely, and handles lateral pressure better than cohesive or silty soils. Match gradation to your engineering specification — gap-graded or poorly graded material can compromise drainage and compaction.
Do geocell retaining walls require a building permit?
Most jurisdictions exempt walls under 4 feet (footing bottom to wall top) unless surcharge loads are present, but requirements vary — verify with your local AHJ before breaking ground. In Iowa, call 811 at least 48 hours before excavating to locate utilities.
How long do geocell retaining walls last?
HDPE geocell systems have a 40-year field track record, with UV stabilization and high ESCR ratings that resist degradation over decades. Longevity depends on correct installation, drainage that prevents hydrostatic pressure buildup, and periodic inspection for erosion or settlement.